Showing posts with label Silk Acrylic Glaze. Show all posts

Thursday, March 20, 2014

SPRING.....Die~Namites Dies Blog Hop

Howdy Die~Namites Fan!!
We WELCOME you to our 
SPRING....a time for plans and projects Blog Hop!


We are so excited to share with you

our new Die~Namites Dies Spring Release.


Did you know Die~Namites Dies are Made in America??
and are compatible with most die-cutting machines on the 

market today. Die~Namites dies will cut cardstock,

patterned paper, fun foam, wool blend felts, craft foils
handmade papers and more!

Shimming may be required for some thicker materials,

just add one at a time and test frequently.

Do you want to keep updated on the latest releases

and creations made with our FABULOUS DIES!

You can do so by.....
“LIKE”ing us on Facebook??
Also, by becoming a Follower of our blog???

As you are hoppin’, make sure to leave a comment on each of the

Design Team Member’s blogs....

several of our Randomly chosen Gift Certificates 

will be chosen from your comments on their blogs.


You will have until Midnight EST on March 22
 to leave your comments 
and to be eligible for our
Grand Prize of a

$50 Gift Certificate

along with 

5 - $10 Gift Certificates


Are you ready to see what our Design Team has created for you??

If you have arrived here from Tonya’s blog, your are in the right place,

if not head back to the Die~Namites blog to begin the hop. 

I was blessed with a Grandson on March 12th.
When he was born I decided I wanted to
teach him a life skill....
and I have chosen to teach him how to plant a garden
and to grow his plants from seeds.

I created a book for us to chart our progress.....


My creation revolved around two AMAZING DIES!


I diecut the Spring Doily 
from a piece of Canvas Corp ~ Black on Kraft paper.


I then diecut the Sunflower Trio
twice from a piece of Canvas Corp ~ Kraft paper.
I painted the Kraft Paper diecuts with
Silk Acrylic Glaze
Mallard Green and
Spicy Tomato.


I trimmed one of the diecuts to be just the stems,
and adhered it to the whole flower image
only on the stems and moulded
the leaves for a dimensional effect.


I then, took a piece of Canvas Corp ~ Tissuestock,
I cut the Tissuestock into 12 ~ 3" x 3" piece.
Because the Tissuestock is so thin
I was able to cut multiple layers at once with the


I placed a brad in the center of the flowers and
scrunched up the layers.
Using a fan brush I painted on a bit of
of Silk Acrylic Glaze ~ Spicy Tomato
spritzed it with a bit of water,
then dried, forming as it dried!
I then adhered the flowers to the whole
diecut image.


I adhered the 
to the front of my book cover that consisted of layers of
Canvas Corp Brands ~ Burlap, Serengeti PP and E Flute.

I hope you have enjoyed our Spring Release Blog Hop!!!

THERE IS STILL TIME
another fun opportunity to win more
FANTABULOUS Die~Namites Dies!

Monday, November 25, 2013

Home Made Gift Wrap

Are you looking for a Unique Gift 
to give this holiday season??

I have just the one for you!!
I LOVE making Home Made Gifts....
so this year I went looking for 
just that right gift!

I found it....

Can I tell you...
this is very dangerous 
because I LOVE TURTLES!

Now, how to Gift Wrap them??
Because.....As you know...
it's ALL ABOUT the presentation!


I pulled out  a piece of Ivory ~  Canvas Corp Tissue Stock,
a couple Crafter's Workshop stencils,
A jug of gesso and
some Emperor's Gold ~ Silk Acrylic Glaze.
And let the fun begin!


I stenciled on the Tissue Stock.
When dry I pulled out a sheet of
Kraft ~ Canvas Corp Tissue Stock
to complete the Gift Wrap.


I tied the packages up 
using Red & Lime Green Hemp Cord
and a bit of Jute Rope
accented with some gold cording.

I created Gift Tags using 
Scallop Tags and Ties ~ Ivory
and 
I diecut a Holly Branch
from a piece of Lime Green on White Paper,
finished off with a Mini Red Poinsettia.


Now WHO wouldn't want to 
receive one of these Little Ditties as a gift??


Here is the link to the
Pretzel Turtle Recipe

I also created a video sharing
how I created my Gift Wrap!


What a great creative project to make
with your children.
And a great time to teach that it is 
better to GIVE than RECEIVE!!

Other Products Used:
Petaloo ~ Mini Poinsettia
Splash of Color ~ Emperor's Gold ~ Silk Acrylic Glaze
Die~Namites Dies ~ Holly Branch


Friday, October 11, 2013

Art is....


Art is not a thing; it is a way. 
 ~Elbert Hubbard


A way of life for me....
the aspect of my life that makes
the rest of my insane world.....
OK!!

This has been one of those
REALLY INSANE weeks!
Can I say.....
I needed my art to get me 
through this one!!


So.......I pulled out some of my
FAVORITE SUPPLIES
and let the 
creative process...
take me away!!


....my favorite supplies....
a bit of burlap,
some twine,
a piece of silk ribbon,
my new favorite flowers,
one of my dies....
and of course.....LOTS OF COLOR!


I began by cutting a piece of
watercolor paper
into the shape of a tag....
and followed the path
my imagination took me!!


.....and when I was done...
Life was ALL GOOD again!

"Love like there is.....
NO TOMORROW!"


Wednesday, September 11, 2013

DREAM BIG!!!!

I began an Art Journal to help explore my creativity.

And it truly stretches me because you have to stay
pretty FLAT....SOOO VERY HARD FOR ME!

I don't have any problems with color....
it's just where you go from there! 


The beauty of Silk Acrylic Glaze is that has little to no water in it
so when you use it on book pages....
they won't wrinkle!!

I painted on layers of Silks...
Apricot Nectar
Yellow Rose and
Stargazer.


....and through
a Mini Harlequin stencil.

I then smeared some Embossing Paste through
Mini Chickwire Reversed.

How cool is the Ephemera Bits Washi Sticker Tape??!?!
Kinda lovin' the stuff myself!!


Add a bit of Gold ~ Precious Metal Effects Paint
spritzed with water....
and watch the goodness move!!

This is where I get stuck....
So...I stepped away from my project.
That's when the inspiration hit!!


I cut hand drawn flowers from various Canvas Corp papers.
Pulled out some Twinkling H20's and began coloring.


I pulled apart a Petaloo flower and
painted on some Gold ~ Precious Metal Effects Paint
and added a vintage button as a center.
For the leaves, I used a Lovely Leaves Stencil
and a bit of Golden Green ~ Ferro Special Effect Paste


I created shadows by smearing the Pitt Big Brush Pens.


And there you have it....
I have to say I truly enjoyed this
creative discovery!

PRODUCT LIST:
SPLASH OF COLOR
Silk Acrylic Glaze:
Apricot NectarYellow RoseStargazer

The Crafter's Workshop
Mini Harlequin
Mini Chicken Wire Reversed

Canvas Corp
Kraft Paper
Linen Paper
Flute Paper

Wendy Vecchi ~ Studio 490
Embossing Paste
Black

Stencils for Art
Lovely Leaves

Faber Castell
Pit Artist Pen Big Brush
Magenta
Warm Grey 


Wednesday, July 31, 2013

....a Wishing Well!

Howdy Peeps....Just found this post
marked as Draft....oooops
Soooo here it is!!!
A new creation using the
EVER AMAZING Petaloo Flowers and
Graphic45 Bohemian Bazaar.

  Wishfull

I had seen this wooden box at my LSS and
just KNEW it would be PERFECT for my
latest creation.
I began by lining the box with Faux Moss
to give it a uber earthy feel.

Wishbottominside

And because I CAN'T JUST LEAVE things along....
I chose to ACCENT the already gorgeous Darjeeling Flowers
with Precious Metal Effects paint....
It just makes the flowers POP!

Wishflwrclust

I adhered strips of the Bohemian Bazaar Collection
to my wooden box.

Wishbottomangel

Once again, I glooped and glopped, with
a bit of a spritz here and there!!
As and added accent...
I created a little flower cluster
on the handle!

Wishsmallflwr

And accented it with a little
G45 Chipboard!
The perfect touch!
And there you have it....
a PERFECT centerpiece for
that special occasion.

Wishsidewhole

Hope you enjoyed my "Wishing Well"
and have a UBER CREATIVE DAY!!!! 

PRODUCTS USED:

GRAPHIC 45
Bohemian Collection
Chipboard
Tags & Pockets
Jasmine Nights
Bohemian Bazaar

Ferro Special Effect Paste ~ Amber Gold
Precious Metal Effect Paint ~ Olive & Bronze
Silks Acrylic Glaze
Honey Amber
Spiced Pumpking
Stargazer
Radiant Rain Shimmering Mist ~ Autumn Leaf

Friday, July 12, 2013

a "30 Minute Quickie" card...

I don’t know about you....
but my life is HECTIC!!!
I ALWAYS seem to be on the go.

I’ve been spending every waking moment
creating CHA projects, designing and 
trying to kick a bad allergic attack.
(Yeah....I FINALLY have my voice back!!)

In all the hub~bub....I TOTALLY forgot I needed to 
make a creation for my Die~Namites Dies blog post.

So I “Whipped up a Quickie” card!!
It was created in under 30 minutes.


I began with a piece of Canvas Corp ~ Kraft paper,
cut to 8.5”x 5.5” and folded in half.
I used my Distrezz it All to tear up the edges.
I stamped on the front of the card with
my favorite Hero Arts verbage stamp....
(I call it “white noise”)


Then I cut a piece of Canvas Corp ~ Kraft E Flute
3.75” x 5”, distressed the edges, wrapped it
with some Jute and adhered it to the front of the card.


and a piece of Canvas Corp ~ Linen paper.
I diecut the Daisy Vine image
and painted it with a bit of
Sweet Alfalfa ~ Twinkling H2O’s
I love how the paper kinda curls
when you dry it with a Heat Tool.
I then adhered it to the face of the card.


Next, I found a package of 
Petaloo ~ CMC ~ Mini Pearl Daisies,
along some Coral Berry and Yellow Rose

Silks Acrylic Glaze.

I spritzed the flowers with water,
and painted each flower the Yellow Rose.
I slightly dried the flowers and 
then with a small paint brush,
I placed slightly watered down Coral Berry
in the center of the Mini Daisy.
(if the paint doesn’t wick up the petals,
spritz with a bit more water.)
Then I dried the flowers.


I adhered the flowers to the Daisy Vine diecut image.
(I added an extra flower as I got a bit
rough with my diecut, when it was wet,
and tore off a piece....oooops!!)

I then wrote my sentiment on some of the leftover
Kraft paper, edged them with a bit of the leftover
Coral Berry and adhered with pop dots.
I also edged the card with a bit of the Coral Berry.

And there you have it.....
a “30 Minute Quickie”!!!

Monday, July 8, 2013

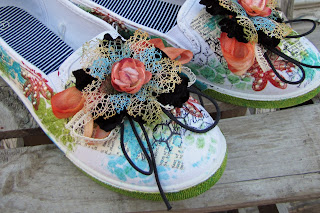
Snazzy Summer Sneakers

I wanted to share with you a little creation I made back in the Spring.


They were such a hit.....
I decided to share with you how I made them!!


Tape off the rubber sole and side of shoes with painters tape.

Tear up a sheet of dictionary paper.
Apply “damp” dictionary paper randomly to shoes with Multi Medium. Dry

Using Template, apply 2 colors (shown Mediterranean Blue and Pretty Peridot) 
of Silk Acrylic Glaze randomly on shoe, allowing each application to dry between layers.


Ink “Cooped up Stamp” with Archival Ink and stamp randomly on shoes. 


Brayer 3rd color of Silk Acrylic Glaze (shown Spiced Pumpkin) on Craft Mat.
Dab stamp into Glaze and stamp randomly on shoes (5 times per shoe).
Dry. Dot flowers with Pearl Pen. Dry.


Spritz left over paint on Craft Mat with water and dip Seam Binding in liquid.
Dry. Tie in a large loopy bow.
Tie a large Loopy bow with Black Cord and vintage lace.


Using Tattered Floral Die, cut (2) large Velvet Flowers.
Apply Multi Medium to back of Velvet flowers while drying crumple flowers. 

Create “Flower Cluster” by layering:
Colored Loopy Bow
Vintage Lace Blow
Black Velvet Flower
Large Mesh Flower
Small Mesh Flower
Small Textured Flower


Adhere layers together with hot glue gun. Adhere “Flower Cluster” to sneaker.
Tuck black cording loopy bow at front of “Flower Cluster”.
All adhered with hot glue gun.

Remove painters tape. If desired, paint sides of shoe soles. 


Hope you enjoyed my Snazzy Sneakers!!!

Materials Used
Petaloo
Mini Textured Flowers ~ Salmon
Mixed Textured ~ Amber (Large Mesh Flowers)
Mixed Textured ~ Teal (Small Mesh Flowers)

Splash of Color 
Silk Acrylic Glaze:
Mediterranean Blue
Pretty Peridot
Spiced Pumpkin
Viva Colour ~ Cream Pearl Pen

The Crafter’s Workshop
Mini Cell Theory Template

Unity Stamp ~ Christy Thomlinson
Cooped Up Notes

Stampers Anonymous ~ Wendy Vecchi
Plaid Posey

Ranger/Tim Holtz
Archival Ink
Multi Medium
Craft Sheet
Tattered Floral die

Canvas Corp
Black Velvet
Black Cord

Misc Products
Stencil Brush
Hot Glue Gun
Vintage Lace

Monday, May 6, 2013

NYC or bust.....

Howdy Peeps.....

Here is my "NYC ARTSY" canvas bag
I created for Winter CHA ~ 2013. 
I designed and created the canvas bag
from Canvas Corp ~ Canvas.
and embellished with the New York Destination Papers
Along with.....LOTS of Viva Colour Pearl Pens!!! 


I began by image transfering various images from
the New York Destination Collection
to different size pieces of Canvas Corp ~ Canvas
using Claudine Hellmuth's ~ Multi Medium ~ Matte.


I chose to use Pearl Pens to color 
the canvas bag and embellies
because they are fully washable when dry!!
What an AWESOME FEATURE!!!

SOOOO....I dipped the caps of the Pearl Pens
into puddles of Pearl Pen and stamped with it,
colored the Petaloo Canvas Flowers with it...
and I found that if I spritzed it with
water or my favorite Radiant Rain Shimmering Mist
when freshly applied....
they could be easily manipulated.
.....and it splatters REALLY WELL, too!!! 
A good example is the matching wallet I made.

http://lynneforsythe.blogspot.com/


I love that it is even dimensional!!!
Hope you have enjoyed my ARTSY creation as
much as I did making it!!!

Products used:

Splash of Color
New York Destination Collection
Monarch Canvas Flowers 
Monarch ~ Canvas Shapes 
Viva Colour ~ Pearl Pens
30065 ~ Orange
30064 ~ Sunny
30073 ~ Copper
30070 ~ Black

Luminarte ~ Silks Acrylic Glaze
Stargazer

Luminarte ~ Radiant Rain Shimmering Mist
26395 ~ Ginger Peach 
26465 ~ Persimmon

Petaloo ~ CMC ~ Canvas Flowers

Tuesday, April 30, 2013

DT Reveal for 2Crafty Chipboard


Can I just say, I am beyond excited to be apart
of the 2013 2Crafty Design Team.
What an UNBELIEVABLE opportunity
to represent such an AMAZING company and
 AMAZING product.


I utilized one of the Wrought Iron Photo Adornment 
 chippies and dabbed Black Embossing Paste 
on for texture.


How much fun are the 1.5" Hexagons,
embellied with Cream ~ Modeling Cream,
through a Mini Hexagon Template
then added Gold and Burgundy
Precious Metal Effect Paint.
And how cute are the Folk Hearts???


I chose to cut apart the ohhhh sooo cute
"Enjoy this moment, This moment is your Life"
For my second project, I created a Chunky ATC.


To begin this project your cut up a 2" x 4"
into a 5" piece. Paint "Chunky ATC" with Gesso.
I cut up a piece of Chicken Wire Chipboard,
painted it and adhered it, randomly, around the "ATC".


I backed the Juliet's Hearts with a piece of paper
and painted it with Precious Metal Effect Paint.
So, the Juliet's Heart would pop!


Can I just say I can't get enough of the 1.5" Hexagons!!


So...what do you think of my "Chunky ATC"???

For my last project I created a card.


Spring has finally sprung here in Northern NH.
Now is the time for Flowers and Birdhouses.
And the ATC Birdhouse chippies were PERFECT!!


The little birdies are just the cutest. 


There are layers and layers of texture, a little bit of Crackle, 
and layers of paint on the Larinda's Flourish!!


What creation of mine would be complete without
a "flower cluster". 
I hope you enjoyed my creations! 

Other Products Used:
Petaloo ~ Darjeeling Flowers
Splash of Color ~ Precious Metal Effect Paint
Sand ~ Stone Effect Paste
Silk Acrylic Glaze
The Crafter's Workshop ~ 6x6 Mini Templates
Canvas Corp ~ Deco Mesh ~ Kraft Flute