Wednesday, July 31, 2013

....a Wishing Well!

Howdy Peeps....Just found this post
marked as Draft....oooops
Soooo here it is!!!
A new creation using the
EVER AMAZING Petaloo Flowers and
Graphic45 Bohemian Bazaar.

  Wishfull

I had seen this wooden box at my LSS and
just KNEW it would be PERFECT for my
latest creation.
I began by lining the box with Faux Moss
to give it a uber earthy feel.

Wishbottominside

And because I CAN'T JUST LEAVE things along....
I chose to ACCENT the already gorgeous Darjeeling Flowers
with Precious Metal Effects paint....
It just makes the flowers POP!

Wishflwrclust

I adhered strips of the Bohemian Bazaar Collection
to my wooden box.

Wishbottomangel

Once again, I glooped and glopped, with
a bit of a spritz here and there!!
As and added accent...
I created a little flower cluster
on the handle!

Wishsmallflwr

And accented it with a little
G45 Chipboard!
The perfect touch!
And there you have it....
a PERFECT centerpiece for
that special occasion.

Wishsidewhole

Hope you enjoyed my "Wishing Well"
and have a UBER CREATIVE DAY!!!! 

PRODUCTS USED:

GRAPHIC 45
Bohemian Collection
Chipboard
Tags & Pockets
Jasmine Nights
Bohemian Bazaar

Ferro Special Effect Paste ~ Amber Gold
Precious Metal Effect Paint ~ Olive & Bronze
Silks Acrylic Glaze
Honey Amber
Spiced Pumpking
Stargazer
Radiant Rain Shimmering Mist ~ Autumn Leaf

Tuesday, July 30, 2013

...and the winner is!!!

OK...so NOBODY got all 3 dies right....
Most had atleast one...
So I decided to throw
ALL THE NAMES in the pot....
and the winner is


Steph....if you email your addy to....
dienamites@gmail.com
we can get your prize
right out to you!!

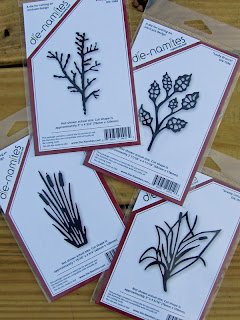
Oh....did you want to know which 4 dies
I DESIGNED....
here they are...

Wednesday, July 24, 2013

Come Visit Me.....

I am soooo EXCITED!!

COME LOOK ME UP.....
if you are in the area this weekend!!!


I will be in the Splash Of Color booth!!!

Monday, July 22, 2013

....they are IN THE HOUSE!!!

I don't know about you....
but TODAY IS THE DAY
I've been waiting for!!!

our NEXT RELEASE of
DIE~NAMITE DIES!!!

SOOO.....without further fan fair!
Here are the little beauties in 
ALL THEIR GLORY!!


Now the REALLLY COOL thing is....
I, Lynne Forsythe, had a hand in
designing 4 of these LOVE~LY dies.

If you can guess which 4 are mine....
I will personally send you ALL 4!!

Here is a little sneak peak to
help you with the guessing process!!


Be sure to leave a comment with your guess....

The New Die~Namites Dies
are available at the Die~Namites Store!!

I will be picking a winner on Monday, July 29th.

Tuesday, July 16, 2013

....a Die~Namite ATC!!!

Happy Tuesday Everyone!!

I wanted to see how cool a Die~Namites Die 
would look on an ATC!!


I used the ohhh sooo cute


I LOVE ATC'S because it is a challenge
to see how much goodness you can put on a 
2.5" x 3.5" space.


I cut 2 Dainty Daises from Kraft Paper.
One I used whole,
the other I cut the leaves from.

I then painted the Die~Cut images
with Olive ~ Precious Metal Effect Paint.


I then embellished the Dainty Daisy Die with
some colored Petaloo Flowers.


I just love all the "GOODNESS" I packed
onto my little canvas!!

Hope I've inspired you to use your Die~Namites dies
for things other than the conventional!!

Friday, July 12, 2013

a "30 Minute Quickie" card...

I don’t know about you....
but my life is HECTIC!!!
I ALWAYS seem to be on the go.

I’ve been spending every waking moment
creating CHA projects, designing and 
trying to kick a bad allergic attack.
(Yeah....I FINALLY have my voice back!!)

In all the hub~bub....I TOTALLY forgot I needed to 
make a creation for my Die~Namites Dies blog post.

So I “Whipped up a Quickie” card!!
It was created in under 30 minutes.


I began with a piece of Canvas Corp ~ Kraft paper,
cut to 8.5”x 5.5” and folded in half.
I used my Distrezz it All to tear up the edges.
I stamped on the front of the card with
my favorite Hero Arts verbage stamp....
(I call it “white noise”)


Then I cut a piece of Canvas Corp ~ Kraft E Flute
3.75” x 5”, distressed the edges, wrapped it
with some Jute and adhered it to the front of the card.


and a piece of Canvas Corp ~ Linen paper.
I diecut the Daisy Vine image
and painted it with a bit of
Sweet Alfalfa ~ Twinkling H2O’s
I love how the paper kinda curls
when you dry it with a Heat Tool.
I then adhered it to the face of the card.


Next, I found a package of 
Petaloo ~ CMC ~ Mini Pearl Daisies,
along some Coral Berry and Yellow Rose

Silks Acrylic Glaze.

I spritzed the flowers with water,
and painted each flower the Yellow Rose.
I slightly dried the flowers and 
then with a small paint brush,
I placed slightly watered down Coral Berry
in the center of the Mini Daisy.
(if the paint doesn’t wick up the petals,
spritz with a bit more water.)
Then I dried the flowers.


I adhered the flowers to the Daisy Vine diecut image.
(I added an extra flower as I got a bit
rough with my diecut, when it was wet,
and tore off a piece....oooops!!)

I then wrote my sentiment on some of the leftover
Kraft paper, edged them with a bit of the leftover
Coral Berry and adhered with pop dots.
I also edged the card with a bit of the Coral Berry.

And there you have it.....
a “30 Minute Quickie”!!!

Monday, July 8, 2013

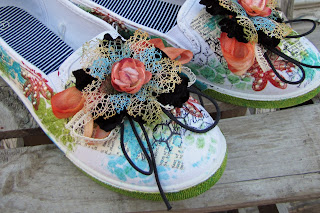
Snazzy Summer Sneakers

I wanted to share with you a little creation I made back in the Spring.


They were such a hit.....
I decided to share with you how I made them!!


Tape off the rubber sole and side of shoes with painters tape.

Tear up a sheet of dictionary paper.
Apply “damp” dictionary paper randomly to shoes with Multi Medium. Dry

Using Template, apply 2 colors (shown Mediterranean Blue and Pretty Peridot) 
of Silk Acrylic Glaze randomly on shoe, allowing each application to dry between layers.


Ink “Cooped up Stamp” with Archival Ink and stamp randomly on shoes. 


Brayer 3rd color of Silk Acrylic Glaze (shown Spiced Pumpkin) on Craft Mat.
Dab stamp into Glaze and stamp randomly on shoes (5 times per shoe).
Dry. Dot flowers with Pearl Pen. Dry.


Spritz left over paint on Craft Mat with water and dip Seam Binding in liquid.
Dry. Tie in a large loopy bow.
Tie a large Loopy bow with Black Cord and vintage lace.


Using Tattered Floral Die, cut (2) large Velvet Flowers.
Apply Multi Medium to back of Velvet flowers while drying crumple flowers. 

Create “Flower Cluster” by layering:
Colored Loopy Bow
Vintage Lace Blow
Black Velvet Flower
Large Mesh Flower
Small Mesh Flower
Small Textured Flower


Adhere layers together with hot glue gun. Adhere “Flower Cluster” to sneaker.
Tuck black cording loopy bow at front of “Flower Cluster”.
All adhered with hot glue gun.

Remove painters tape. If desired, paint sides of shoe soles. 


Hope you enjoyed my Snazzy Sneakers!!!

Materials Used
Petaloo
Mini Textured Flowers ~ Salmon
Mixed Textured ~ Amber (Large Mesh Flowers)
Mixed Textured ~ Teal (Small Mesh Flowers)

Splash of Color 
Silk Acrylic Glaze:
Mediterranean Blue
Pretty Peridot
Spiced Pumpkin
Viva Colour ~ Cream Pearl Pen

The Crafter’s Workshop
Mini Cell Theory Template

Unity Stamp ~ Christy Thomlinson
Cooped Up Notes

Stampers Anonymous ~ Wendy Vecchi
Plaid Posey

Ranger/Tim Holtz
Archival Ink
Multi Medium
Craft Sheet
Tattered Floral die

Canvas Corp
Black Velvet
Black Cord

Misc Products
Stencil Brush
Hot Glue Gun
Vintage Lace

Friday, July 5, 2013

Happy be~lated 4th of July!!

I do have to say.....
when the 4th of July falls mid~week
it really kinda messes up the whole 
holiday weekend thing!!

So....yes I know I am a day late....
but this is one of those holidays
that we will keep celebrating into
the weekend!!

I wanted to share with you
a couple of "spirited" cards
that I created for Reminisce
using the "Let Freedom Ring" collection

The first card has lots of fabric and Gelatos
and Red German Glitter outlining the stars!


This card is a bit more me...
with a bit of Canvas, mesh and a bit of sewing!


As we go about the rest of the holiday weekend...
celebrating our countries independence....
Let us not forget those who have gone before
and who still serve today...
to PRESERVE THAT FREEDOM!!!

Monday, July 1, 2013

You are invited.....

I had been working on some cards for a 4th of July Celebration.


I began with G45's Place in Time ~ July paper.
I ran the edges of the folded card through
my Distrezz it All to tear it up a bit.
Added some gorgeous Petaloo flowers
to the accent the creation.

But when I was finished....it just looked like it needed
SOMETHING MORE. 


and took my card from....nice


to AMAZING.


I cut the diecut Flower Scroll image apart
so I could accent the verbage
with the butterfly.


Here is what the whole card looks like.....


...that's how I took my card,
UP A NOTCH!!

A HAPPY and SAFE
4th of July to ALL!!1

Products used:


Graphic45 ~ Place in Time ~ July paper
Cardstock Stickers

Petaloo Flowers

Distrezz It All